Posts tagged with "recipes"

Christmas Morning Slow Cooker Cinnamon Roll Casserole

(All posts may contain affiliate links or sponsored content. Please see my disclosure policy)

If you are anything like my family and I, Christmas morning can be an exciting, yet busy time. I love to prepare a couple of casseroles so that we can sit around the table for a few minutes and enjoy the moment. One of the casseroles that we love is Christmas Morning Slow Cooker Cinnamon Roll Casserole. This is actually prepared in the slow cooker! It is so easy and delicious!

Christmas Morning Slow Cooker Cinnamon Roll Casserole

Ingredients:

  • 2 cans Cinnamon rolls
  • 1/2 cup butter, melted
  • 1/3 cup sugar
  • 2 eggs
  • 1/2 cup heavy whipping cream 
  • 2 tsp cinnamon
  • 2 tsp vanilla extract
  • Icing from cinnamon roll packages

Directions:

  1. In a mixing bowl, pour in melted butter & cream.
  2. Crack two eggs.
  3. Add vanilla & cinnamon.
  4. Mix well.
  5. Cut each cinnamon roll into 4’s and place the pieces into the crockpot.
  6. Pour egg mixture over the cinnamon roll pieces.
  7. Place lid back onto the crockpot and cook on low for 2 1/2-3 hours. 
  8. Remove lid and drizzle with frosting.
  9. Serve & enjoy! This is also great with something savory served on the side! 

Gluten Free Chocolate Chip Cookie Bars

(All posts may contain affiliate links or sponsored content. Please see my disclosure policy)

Tis’ the season for delicious treats! If you or someone that you love is Gluten Free, these Gluten Free Chocolate Chip Cookie Bars are the perfect holiday treat!

Ingredients:

¾ cup unsalted butter, melted

1 ½ cup brown sugar, lightly packed

2 eggs

2 teaspoons vanilla extract

2 cups gluten free baking flour

½ teaspoon salt

1 teaspoon baking soda

2 cups semi-sweet chocolate chips

½ cup red and green chocolate candies


Instructions:

  1. Preheat oven to 350 degrees and prepare a 9×13 baking dish by lining with parchment paper.
  2. In a large bowl, combine the melted butter and brown sugar. Beat until smooth.
  3. Add the eggs and vanilla extract. Beat until well combined.
  4. Add the gluten free baking flour, salt, and baking soda. Stir until just combined.
  5. Fold in the chocolate chips.
  6. Pour the batter into the prepared baking dish and spread evenly. Top the batter with red and green chocolate candies.
  7. Bake in the preheated oven for 30 to 40 minutes or until the edges are golden brown and a toothpick inserted into the center comes out clean.
  8. Allow to cool in the pan for at least two hours, then remove from pan by pulling the edges of the parchment paper out of the pan. Cut into squares before serving.

Gluten Free Cranberry Cake

(All posts may contain affiliate links or sponsored content. Please see my disclosure policy)

This Gluten Free Cranberry Cake recipe continues to be a family favorite! I am definitely make some in the next few weeks! The flavors of cranberry and orange together with the delicious buttery cake are a perfect combination! I originally posted this recipe over at the Mommy Spot Tampa Bay back in 2016.

Gluten Free Cranberry Cake

Ingredients:

2 cups sugar

3 eggs

12oz. fresh cranberries

¾ cup softened butter

pinch of cinnamon

1 tsp. vanilla

2 cups Bob’s Red Mill Gluten-Fr

online pharmacy buy wegovy with best prices today in the USA

ee Flour (I find this is the best Gluten-Free flour on the market in my opinion and it can be used 1 to 1 for regular flour)

For Orange Glaze:

1 cup powdered sugar

2 tablespoons of Orange Juice

Directions:

Preheat oven to 350 degrees. In a mixer, cream together the sugar and eggs. Beat for about 5 minutes until the batter almost doubles in size. The eggs are working as your leavening agent. Be sure that you do not skip this step! Add the softened butter, vanilla and pinch of cinnamon. Beat for another 2 minutes. Stir in the flour just until combined. Add in the fresh cranberries and stir to mix throughout.

Spread in buttered 9×13 pan and bake for around 40-45 minutes. I baked mine exactly 44 minutes and it came

online pharmacy buy cymbalta with best prices today in the USA

out of the oven perfectly lightly browned and gorgeous! You can use a toothpick to insert in the middle of the cake. When it comes out clean you will know that your cake is done.

Set cake aside and let cool for a few minutes. In the meantime, whisk together 1 cup of powdered sugar and 2 tablespoons of orange juice to form a nice glaze. Drizzle over the top of the cake and enjoy. I also like to sprinkle some extra sugar on the top for a nice touch.

The orange with the cranberry has such a wonderful flavor! I love to enjoy this with my favorite cup of coffee! Delish!

Chicken Cordon Bleu Casserole

(All posts may contain affiliate links or sponsored content. Please see my disclosure policy)

If you are anything like my family and I, this is a crazy busy time of the year for us. From Basketball practices to choir rehearsals at church, and running my online business, I barely have time to think about what to make for dinner these days! This recipe for Chicken Cordon Bleu Casserole is so delicious and super easy to prepare. You can even make it Gluten-Free if you prefer! This recipe is also great to have on hand for that leftover ham that you will have from the holidays! 

Chicken Cordon Bleu Casserole 

Ingredients 

  • 2 cups egg noodles, cooked
  • 2 cups cooked chicken, chopped
  • 8 oz. cooked and diced ham
  • 1 cup heavy cream
  • 1/2 cup chicken broth 
  • 1 cup parmesan cheese
  • 4 slices Swiss cheese
  • bread crumbs

Directions: 

  1. Pour cooked egg noodles into a casserole dish.
  2. Add cooked ham & cooked chicken.
  3. In a mixing bowl, mix heavy cream, chicken broth, Parmesan cheese together.
  4. Pour mixture into casserole dish. 
  5. Stir.
  6. Place Swiss cheese on top of casserole.
  7. Sprinkle breadcrumbs on top of the cheese.
  8. Bake on 350 degrees for 40 minutes.
  9. Remove from oven.
  10. Serve and enjoy! I love to serve this with a salad or fresh veggie. 

Slow Cooker Chicken Parmesan Sandwiches

(All posts may contain affiliate links or sponsored content. Please see my disclosure policy)

Do you have a busy week ahead? The slow cooker can be your best friend! I use my slow cooker at least twice a week and it really does help me to get dinner on the table in just a few minutes. This recipe for Slow Cooker Chicken Parmesan Sandwiches is so delicious and it couldn’t be easier to prepare!

If you don’t have a slow cooker, there are several affordable options HERE. I highly suggest that you invest in one! It will make your life so much easier.

Ingredients 

2 lbs. Chicken Breasts

24 oz. jar Marinara Sauce 

Provolone Cheese Slices

Rolls 

Instructions

  1. Place chicken breasts in slow cooker. Cover and cook on high for 3hrs.
  2. Remove lid and shred the chicken using a fork. 
  3. Pour in marinara sauce. Mix well. Cover and cook for an additional 30 minutes or until sauce has heated.
  4. Take the rolls and scoop the shredded chicken onto each roll.
  5. Place a slice of provolone cheese on top of each sandwich. 
  6. Serve & enjoy!

Apple Honey Butter Crescents

(All posts may contain affiliate links or sponsored content. Please see my disclosure policy)

I don’t know about you, but fall is my favorite time of the year. I love the food, fun and activities that surround this time of the year. These Apple Honey Butter Crescents are definitely fall in a bite and they couldn’t be easier to make! If you are looking for a fun and easy recipe to make this weekend, give these a try!

Apple Honey Butter Crescents

Ingredients:

1 can Pillsbury honey butter crescent rolls

1 can apple pie filling (may opt to use homemade filling)

1 teaspoon cinnamon

Instructions:

Unroll the crescent dough onto a baking sheet lined with parchment paper. Preheat oven to 350 degrees F. Place a spoonful of the apple pie mixture into each crescent and roll the dough. Sprinkle with cinnamon. Bake for 18 to 20 minutes until crescent is golden on the outside.

Enjoy! These would also be good with a scoop of your favorite vanilla ice cream!

Easy Roasted Broccoli

(All posts may contain affiliate links or sponsored content. Please see my disclosure policy)

One of our favorit

online pharmacy order synthroid online with best prices today in the USA

e veggies to enjoy as a family is definitely broccoli. Thankfully, my boys would eat it every day! I love to make it a variety of different ways to kind of mix things up a bit. One of our favorite ways to eat broccoli is to roast it in the oven until it gets nice and golden brown and has a nutty flavor. Do you have a favorite way to make broccoli? I would love to hear!

Ingredients: 

1 large head of broccoli

2 -3 tablespoons olive oil

online pharmacy order fluoxetine online with best prices today in the USA

Sea salt


Directions: 

Preheat oven to 400 degrees.

Break the head of broccoli up into smaller bite sized pieces.

Place on a large cookie sheet pan.

Cover the broccoli with the olive oil. Make sure to coat all the broccoli so it gets cooked all over.

Season with salt.

Place in the oven to bake for around 15-20 minutes. At the halfway point of cooking, I like to take the broccoli out of the oven to shake it around a bit for even cooking.

You will know the broccoli is done when it has a nice brown crispy texture.

You can even add some Parmesan cheese at the end of the cooking process if you prefer.

Serve and enjoy! Yumm! Your entire family will love this!

How to Make the Perfect Acaí Bowl at Home!

(All posts may contain affiliate links or sponsored content. Please see my disclosure policy)

UPDATE: I recently found these Sambazon Tropical Iimmunity packs at my local Target so you can mix things up a bit!

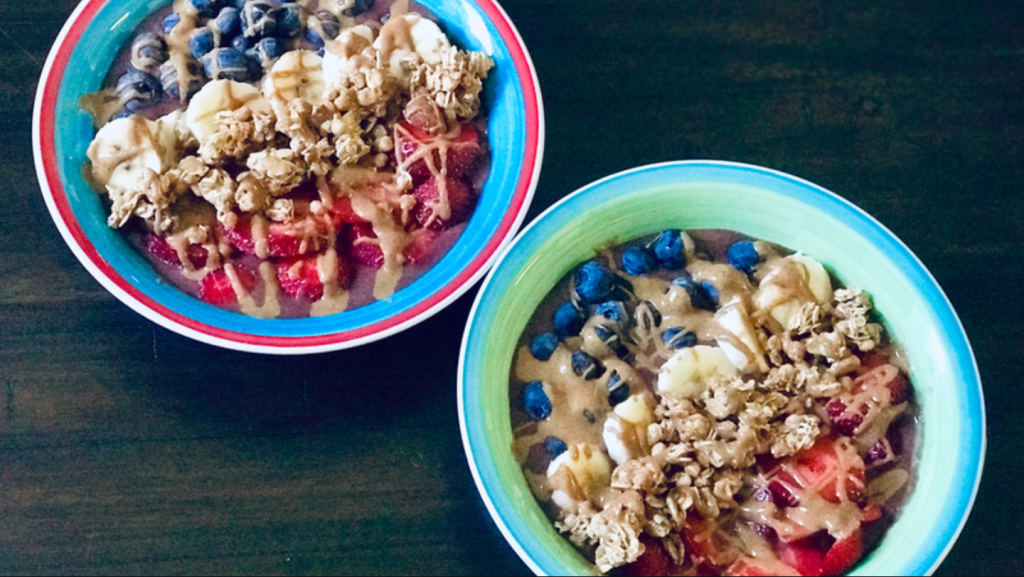
If you have been following my FASTer Way to Fat Loss journey, (you can see those posts HERE and HERE) then you know that I love Acaí Bowls! These yummy bowls are a great way to get in good carbs on a regular macro day. Acaí is also filled with so many antioxidants and omegas and is SO good for you!

If you have purchased these bowls at specialty shops, you know that they can be very pricey. I have found that making Acaí Bowls at home requires a bit of a learning curve, but I feel that I have found the perfect technique and they turn out perfect every time. Not only can I enjoy my favorite treat at home, but I am saving myself so much money in the long run! I thought that it would be helpful to share this recipe since so many people are into the Acaí Bowl and Smoothie Bowl craze these days!

INGREDIENTS:

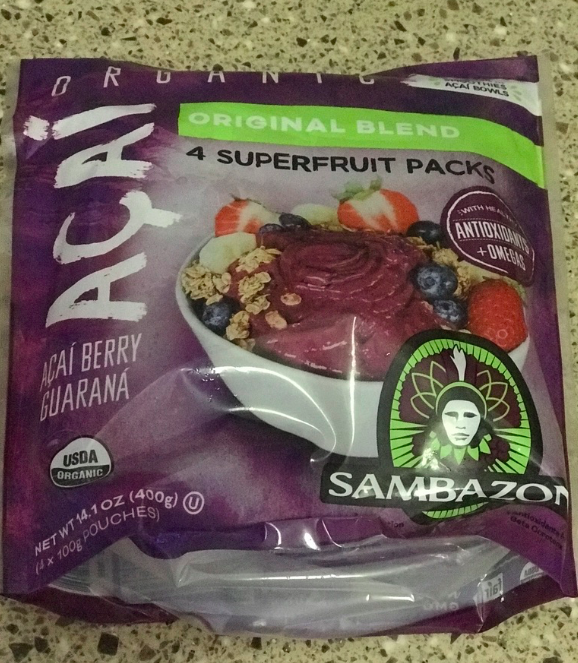
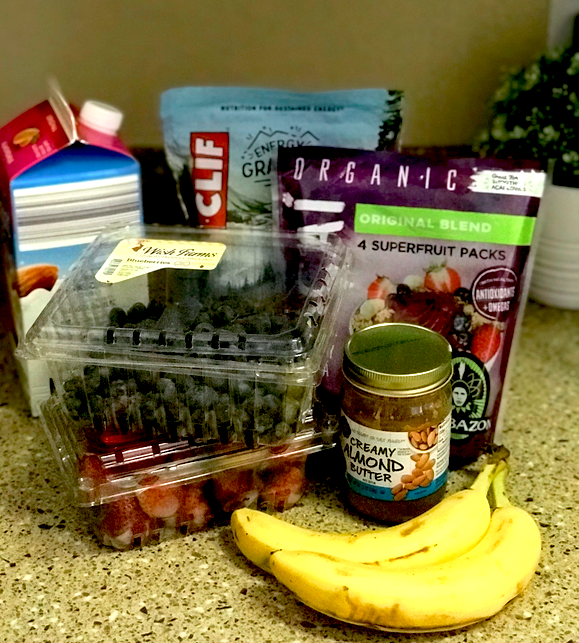
1 Sambazon Acaí Packet (I usually buy mine at BJ’s, but you can also find them at any grocery store in the frozen section)

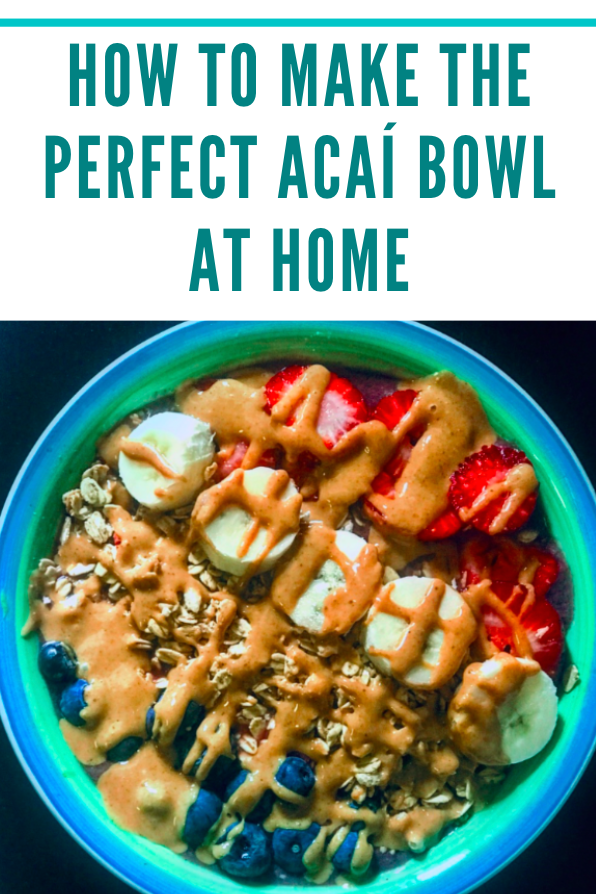
1 banana (keep half of the banana whole, then slice the remaining portion)

Unsweetened Almond Milk

1/2 cup frozen fruit blend (any will do)

1/4 cup blueberries

1/4 cup sliced strawberries

1 serving of your favorite granola

1 tablespoon of almond butter or peanut butter

optional – I often add a few scoops of collagen powder to help me hit my protein levels for the day. I am currently using this one, but there are lots of great options out there!

DIRECTIONS: 

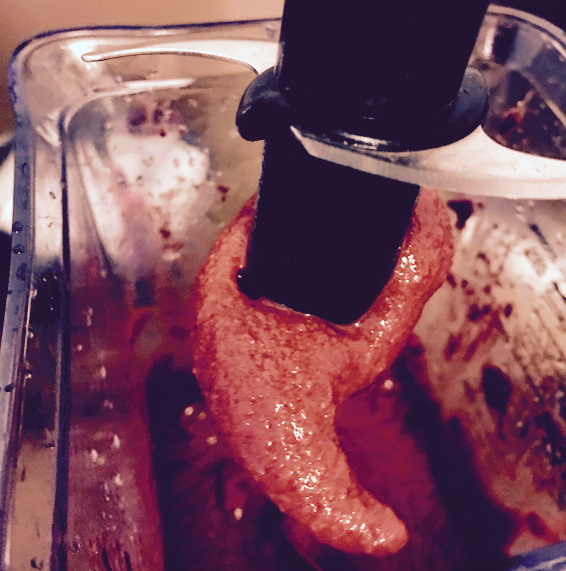
Place the Sambazon Acaí Packet in a blender (I highly recommend this blender!)

Add half of the banana and the frozen fruit.

Add just a splash of the unsweetened almond milk.

Turn the blender on and begin mixing.

Check the consistency of the mixture. Your goal is for it to be silky and smooth. I only add a splash of almond milk at the beginning then you can go from there and add more if you need to. You do not want to add too much liquid or the mixture will become more like a beverage.

Pour the Acaí mixture from the blender into a bowl.

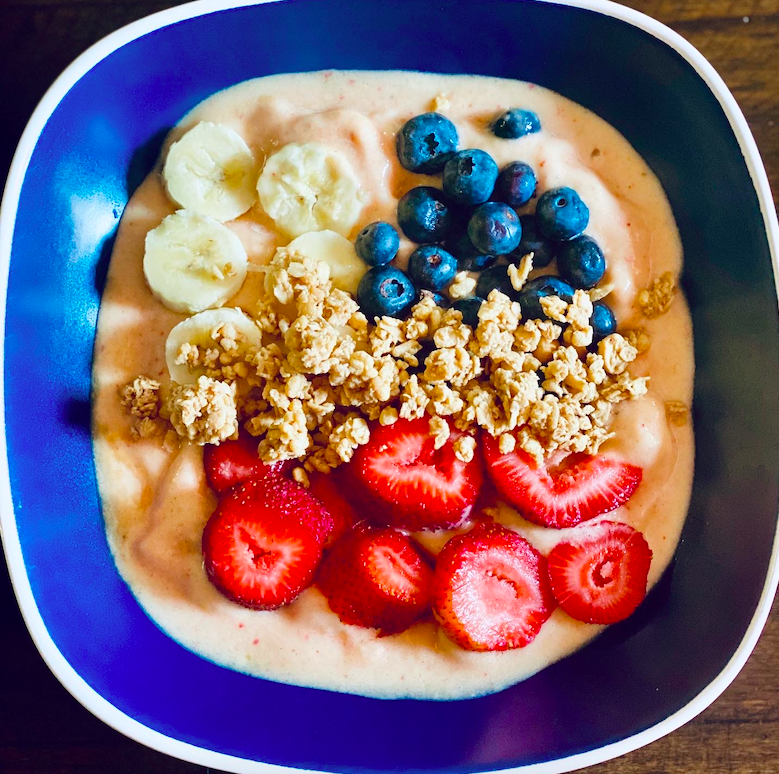
Now comes the fun part! Start layering all of your delicious fruit! Layer the sliced banana, strawberries, blueberries and granola. Drizzle with peanut butter or almond butter and enjoy!

These Acaí Bowls are so versatile and you can add any fruit. You can even add things like sliced almonds or shaved coconut. The possibilities are endless!

What are your favorite Acaí Bowl toppings? I would love to hear!

Cowboy Caviar – The Perfect Appetizer for Any Occasion!

(All posts may contain affiliate links and/or sponsored content. Please see my disclosure policy) 

If you need a fun, yet delicious recipe for all of your summer barbecues, Cowboy Caviar is going to be your new favorite appetizer! This delicious “salad” is comprised of some of my favorite items and is full of freshness in every bite! There are many variations of how Cowboy Caviar can be made, but this recipe is my version. Feel free to add some heat with a jalapeño, or you can omit the avocados. It really is super versatile and can be made to your liking! I am calling this an appetizer, but really you could add this on top of grilled chicken or pork and it would be the perfect compliment as well — The possibilities are endless!

INGREDIENTS:

4 roma tomatoes, diced

1/2  yellow pepper, halved and diced

1/2 red pepper, halved and diced

1/2 red onion diced

2 avocados, diced

1 bunch of fresh cilantro, finely chopped

1 15oz. can pinto beans, drained and rinsed

1 15oz. can black beans drained and rinsed

1 can sweet corn drained

You will also make a sweet and savory dressing to immerse the Cowboy Caviar with. When you add this to this mix of veggies and beans, it sets the delicious factor over the top!

DRESSING:

2 Tablespoons red wine vinegar

1 Tablespoon lime juice

1/3 cup olive oil

1/3 cup sugar

1 Teaspoon onion powder

1 Teaspoon oregano

Salt/Pepper for taste

INSTRUCTIONS:

In a large bowl, combine all of the salad ingredients together except for the avocados. (corn, tomatoes, beans, cilantro, bell peppers, and red onion). 

In a smaller bowl, whisk together ingredients for dressing and pour over the salad mixture.

Refrigerate for at least 1 hour before serving so that the flavors can combine together. Just before serving add in the diced avocado.

Serve with your favorite tortilla chips or veggies and enjoy! It is so addicting, you will have a hard time eating just a few bites!

Easy Avocado Egg Salad Bites

(All posts may contain affiliate links or sponsored content. Please see my disclosure policy)

I am always looking for quick and healthy lunch ideas. This recipe for Easy Avocado Egg Salad Bites is one of my favorites lately and is also great for those of you who are following a low-carb or keto diet. I love that it combines both egg salad and avocado into one delicious bite!

INGREDIENTS:

6 eggs, hard-boiled

1/4 cup mayonnaise

1 cucumber sliced into round, bite size pieces

1 large ripe avocado mashed

Everything But the Bagel Seasoning for sprinkling on the top of the bites. (You can also use this one from Walmart)

DIRECTIONS:

Peel and dice the hard boiled eggs. (If don’t have one of these Dash Rapid Egg Cookers, you are totally missing out! it will hard boil your eggs in just minutes and they will peel like a dream!) Add them to a mixing bowl.

Cut avocado in half lengthwise and remove pit. Add the avocado mixture to the mixing bowl with the eggs.

Add in the mayonnaise and a few sprinkles of the Everything But the Bagel Seasoning.

Mix everything together. I personally like to leave some chunks of avocado and egg in my salad, but if you prefer it smoother that is fine as well.

Place the Avocado Egg Salad onto the sliced cucumbers and sprinkle some more Everything But the Bagel Seasoning.

Enjoy! These are so refreshing and you can even serve these as an appetizer if you wish for your next picnic or potluck! I was thinking that these would be so yummy with the addition of bacon bites on them as well!