Recipes

Gluten Free Cranberry Cake

(All posts may contain affiliate links or sponsored content. Please see my disclosure policy)

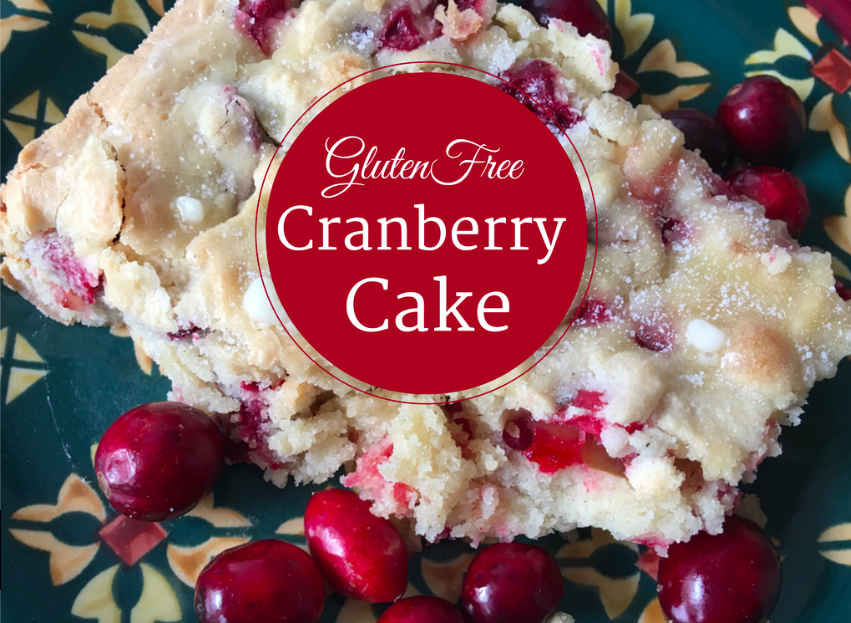
This Gluten Free Cranberry Cake recipe continues to be a family favorite! I am definitely make some in the next few weeks! The flavors of cranberry and orange together with the delicious buttery cake are a perfect combination! I originally posted this recipe over at the Mommy Spot Tampa Bay back in 2016.

Gluten Free Cranberry Cake

Ingredients:

2 cups sugar

3 eggs

12oz. fresh cranberries

¾ cup softened butter

pinch of cinnamon

1 tsp. vanilla

2 cups Bob’s Red Mill Gluten-Fr

online pharmacy buy wegovy with best prices today in the USA

ee Flour (I find this is the best Gluten-Free flour on the market in my opinion and it can be used 1 to 1 for regular flour)

For Orange Glaze:

1 cup powdered sugar

2 tablespoons of Orange Juice

Directions:

Preheat oven to 350 degrees. In a mixer, cream together the sugar and eggs. Beat for about 5 minutes until the batter almost doubles in size. The eggs are working as your leavening agent. Be sure that you do not skip this step! Add the softened butter, vanilla and pinch of cinnamon. Beat for another 2 minutes. Stir in the flour just until combined. Add in the fresh cranberries and stir to mix throughout.

Spread in buttered 9×13 pan and bake for around 40-45 minutes. I baked mine exactly 44 minutes and it came

online pharmacy buy cymbalta with best prices today in the USA

out of the oven perfectly lightly browned and gorgeous! You can use a toothpick to insert in the middle of the cake. When it comes out clean you will know that your cake is done.

Set cake aside and let cool for a few minutes. In the meantime, whisk together 1 cup of powdered sugar and 2 tablespoons of orange juice to form a nice glaze. Drizzle over the top of the cake and enjoy. I also like to sprinkle some extra sugar on the top for a nice touch.

The orange with the cranberry has such a wonderful flavor! I love to enjoy this with my favorite cup of coffee! Delish!

Chicken Cordon Bleu Casserole

(All posts may contain affiliate links or sponsored content. Please see my disclosure policy)

If you are anything like my family and I, this is a crazy busy time of the year for us. From Basketball practices to choir rehearsals at church, and running my online business, I barely have time to think about what to make for dinner these days! This recipe for Chicken Cordon Bleu Casserole is so delicious and super easy to prepare. You can even make it Gluten-Free if you prefer! This recipe is also great to have on hand for that leftover ham that you will have from the holidays! 

Chicken Cordon Bleu Casserole 

Ingredients 

  • 2 cups egg noodles, cooked
  • 2 cups cooked chicken, chopped
  • 8 oz. cooked and diced ham
  • 1 cup heavy cream
  • 1/2 cup chicken broth 
  • 1 cup parmesan cheese
  • 4 slices Swiss cheese
  • bread crumbs

Directions: 

  1. Pour cooked egg noodles into a casserole dish.
  2. Add cooked ham & cooked chicken.
  3. In a mixing bowl, mix heavy cream, chicken broth, Parmesan cheese together.
  4. Pour mixture into casserole dish. 
  5. Stir.
  6. Place Swiss cheese on top of casserole.
  7. Sprinkle breadcrumbs on top of the cheese.
  8. Bake on 350 degrees for 40 minutes.
  9. Remove from oven.
  10. Serve and enjoy! I love to serve this with a salad or fresh veggie. 

Slow Cooker Chicken Parmesan Sandwiches

(All posts may contain affiliate links or sponsored content. Please see my disclosure policy)

Do you have a busy week ahead? The slow cooker can be your best friend! I use my slow cooker at least twice a week and it really does help me to get dinner on the table in just a few minutes. This recipe for Slow Cooker Chicken Parmesan Sandwiches is so delicious and it couldn’t be easier to prepare!

If you don’t have a slow cooker, there are several affordable options HERE. I highly suggest that you invest in one! It will make your life so much easier.

Ingredients 

2 lbs. Chicken Breasts

24 oz. jar Marinara Sauce 

Provolone Cheese Slices

Rolls 

Instructions

  1. Place chicken breasts in slow cooker. Cover and cook on high for 3hrs.
  2. Remove lid and shred the chicken using a fork. 
  3. Pour in marinara sauce. Mix well. Cover and cook for an additional 30 minutes or until sauce has heated.
  4. Take the rolls and scoop the shredded chicken onto each roll.
  5. Place a slice of provolone cheese on top of each sandwich. 
  6. Serve & enjoy!

Pumpkin Face Quesadillas

(All posts may contain affiliate links or sponsored content. Please see my disclosure policy)

Are you looking for a fun, festive and affordable way to celebrate Halloween? Your kids will think that you are rockstar when you make them these adorable Pumpkin Face Quesadillas! They are super easy and require just a few ingredients! You can even use Gluten Free Tortillas if you have a family member with allergy issues.

Ingredients 

  • Cheddar Cheese 
  • 2 Flour Tortillas (you can also substitute gluten free ones)
  • Butter spray or butter to melt in the pan
  1. Take a sharp knife or cookie cutter & a flour tortilla and cut out a pumpkin face. 
  2. Sprinkle cheddar cheese on the other flour tortilla.
  3. Place the pumpkin face cut-out tortilla on top of the cheese covered tortilla.
  4. Place in a frying pan or griddle on medium heat with melted butter. Cover with a lid so the cheese melts. You can not flip the quesadilla so the lid will help heat the top. 
  5. Once cheese has fully melted, serve & enjoy! 

Happy Halloween!

Apple Honey Butter Crescents

(All posts may contain affiliate links or sponsored content. Please see my disclosure policy)

I don’t know about you, but fall is my favorite time of the year. I love the food, fun and activities that surround this time of the year. These Apple Honey Butter Crescents are definitely fall in a bite and they couldn’t be easier to make! If you are looking for a fun and easy recipe to make this weekend, give these a try!

Apple Honey Butter Crescents

Ingredients:

1 can Pillsbury honey butter crescent rolls

1 can apple pie filling (may opt to use homemade filling)

1 teaspoon cinnamon

Instructions:

Unroll the crescent dough onto a baking sheet lined with parchment paper. Preheat oven to 350 degrees F. Place a spoonful of the apple pie mixture into each crescent and roll the dough. Sprinkle with cinnamon. Bake for 18 to 20 minutes until crescent is golden on the outside.

Enjoy! These would also be good with a scoop of your favorite vanilla ice cream!

Easy Roasted Broccoli

(All posts may contain affiliate links or sponsored content. Please see my disclosure policy)

One of our favorit

online pharmacy order synthroid online with best prices today in the USA

e veggies to enjoy as a family is definitely broccoli. Thankfully, my boys would eat it every day! I love to make it a variety of different ways to kind of mix things up a bit. One of our favorite ways to eat broccoli is to roast it in the oven until it gets nice and golden brown and has a nutty flavor. Do you have a favorite way to make broccoli? I would love to hear!

Ingredients: 

1 large head of broccoli

2 -3 tablespoons olive oil

online pharmacy order fluoxetine online with best prices today in the USA

Sea salt


Directions: 

Preheat oven to 400 degrees.

Break the head of broccoli up into smaller bite sized pieces.

Place on a large cookie sheet pan.

Cover the broccoli with the olive oil. Make sure to coat all the broccoli so it gets cooked all over.

Season with salt.

Place in the oven to bake for around 15-20 minutes. At the halfway point of cooking, I like to take the broccoli out of the oven to shake it around a bit for even cooking.

You will know the broccoli is done when it has a nice brown crispy texture.

You can even add some Parmesan cheese at the end of the cooking process if you prefer.

Serve and enjoy! Yumm! Your entire family will love this!

How to Make the Perfect Acaí Bowl at Home!

(All posts may contain affiliate links or sponsored content. Please see my disclosure policy)

UPDATE: I recently found these Sambazon Tropical Iimmunity packs at my local Target so you can mix things up a bit!

If you have been following my FASTer Way to Fat Loss journey, (you can see those posts HERE and HERE) then you know that I love Acaí Bowls! These yummy bowls are a great way to get in good carbs on a regular macro day. Acaí is also filled with so many antioxidants and omegas and is SO good for you!

If you have purchased these bowls at specialty shops, you know that they can be very pricey. I have found that making Acaí Bowls at home requires a bit of a learning curve, but I feel that I have found the perfect technique and they turn out perfect every time. Not only can I enjoy my favorite treat at home, but I am saving myself so much money in the long run! I thought that it would be helpful to share this recipe since so many people are into the Acaí Bowl and Smoothie Bowl craze these days!

INGREDIENTS:

1 Sambazon Acaí Packet (I usually buy mine at BJ’s, but you can also find them at any grocery store in the frozen section)

1 banana (keep half of the banana whole, then slice the remaining portion)

Unsweetened Almond Milk

1/2 cup frozen fruit blend (any will do)

1/4 cup blueberries

1/4 cup sliced strawberries

1 serving of your favorite granola

1 tablespoon of almond butter or peanut butter

optional – I often add a few scoops of collagen powder to help me hit my protein levels for the day. I am currently using this one, but there are lots of great options out there!

DIRECTIONS: 

Place the Sambazon Acaí Packet in a blender (I highly recommend this blender!)

Add half of the banana and the frozen fruit.

Add just a splash of the unsweetened almond milk.

Turn the blender on and begin mixing.

Check the consistency of the mixture. Your goal is for it to be silky and smooth. I only add a splash of almond milk at the beginning then you can go from there and add more if you need to. You do not want to add too much liquid or the mixture will become more like a beverage.

Pour the Acaí mixture from the blender into a bowl.

Now comes the fun part! Start layering all of your delicious fruit! Layer the sliced banana, strawberries, blueberries and granola. Drizzle with peanut butter or almond butter and enjoy!

These Acaí Bowls are so versatile and you can add any fruit. You can even add things like sliced almonds or shaved coconut. The possibilities are endless!

What are your favorite Acaí Bowl toppings? I would love to hear!

Gluten Free Triple Berry Crisp

This recipe was created in part of a sponsored campaign for Wish Farms. (All posts may contain affiliate links or sponsored content. Please see my disclosure policy)

There is something about the summertime that makes me want to eat all the berries! Strawberries, blueberries, blackberries, raspberries…..I love them all! This recipe for Gluten Free Triple Berry Crisp was created around my love for berries, and is packed full of berry goodness in every bite! I hope that you will enjoy it as much as we did! This is a gluten free recipe, but you can easily adjust to make it your own by not using gluten free flour and oats.

Gluten Free Triple Berry Crisp

Ingredients

Filling

1 1/2 cups fresh halved strawberries

2 cups fresh blueberries

1 cup fresh blackberries

1 1/2 Tbsp cornstarch

2 Tbsp. Swerve or regular sugar


Crumble

3/4 cup gluten flour of your choice (this is what I used)

1 cup of gluten free oats of your choice (love these)

1/2 cup packed brown sugar

1/4 cup Swerve (you can also use regular sugar)

1 1/2 sticks unsalted cold butter diced into small pieces

1/4 tsp. cinnamon

1/4 tsp. salt


Instructions

Preheat the oven to 350 degrees and grease a 9 x 9 or 11 x 7 baking dish.

In a mixing bowl, place the flour, oats, granulated sugar, brown sugar, cinnamon and salt. Whisk together just until mixed.

Add the cold butter pieces into the flour/sugar mixture, and with a fork or pastry blender, mix together just until it resembles coarse crumbs. Set aside or place in the refrigerator until you are ready to use.

In a separate bowl, add the berries. Sprinkle with the 2 Tbsp. of Swerve and Cornstarch and lightly mix together. Make sure that all of the berries are evenly coated.

Spread the berry mixture in the buttered baking dish.

Spread the Crumble mixture evenly over the top of the berries.

Bake in preheated oven and cook until golden brown and bubbly. Cooking time is approximately 30-35 minutes.

Serve with ice cream or fresh whipped cream and enjoy!

Pin it for later HERE!

Pulled Pork Tostadas

(All posts may contain affiliate links and/or sponsored content. Please see my disclosure policy) 

Since my youngest son Brady was diagnosed with Celiac Disease last month, I have been on a mission to develop and prepare recipes that the entire family will enjoy that are Gluten Free. Thankfully, in the world that we live, there are now so many GF options that are readily available.

We love to have tacos at least once a week, so this new recipe, Pulled Pork Tostadas is an ode to our love for Mexican food. The pulled pork that I used for this recipe was the tubs of Curly’s Pulled Pork that was BOGO at Publix recently. Thankfully, it is GF. I find myself scouring the labels now of every food to be so careful about I feed Brady. You could also prepare the pulled pork yourself, but this Momma is all about getting a meal on a table as quickly as I can! (especially during these busy summer months) The entire family loved these Pulled Pork Tostadas, and I hope that you will too! Feel free to add or omit any toppings that you prefer to make them your own.

INGREDIENTS:

1 22-count package of Mission Tostadas like the ones here (you will only need 10 for this recipe so save the rest for another day)

2 tubs of Curly’s Pulled Pork (or any other brand that says it is GF)

3 green onions diced

1 bag of Mexican Style Shredded Cheese

1/2 bunch of cilantro, finely chopped

INSTRUCTIONS:

Preheat the oven to 350 degrees.

While the oven is preheating arrange Tostadas on a cooking sheet.

Spoon the pork mixture evenly on top of each tostado and cover with cheese and green onions.

Bake in the oven until Tostadas are golden brown and the cheese is nice and bubbly.

Top with chopped cilantro and enjoy! I served with cilantro lime rice.

You can even add salsa, taco sauce,  jalapeño or fresh guacamole. The possibilities are endless! 

Cowboy Caviar – The Perfect Appetizer for Any Occasion!

(All posts may contain affiliate links and/or sponsored content. Please see my disclosure policy) 

If you need a fun, yet delicious recipe for all of your summer barbecues, Cowboy Caviar is going to be your new favorite appetizer! This delicious “salad” is comprised of some of my favorite items and is full of freshness in every bite! There are many variations of how Cowboy Caviar can be made, but this recipe is my version. Feel free to add some heat with a jalapeño, or you can omit the avocados. It really is super versatile and can be made to your liking! I am calling this an appetizer, but really you could add this on top of grilled chicken or pork and it would be the perfect compliment as well — The possibilities are endless!

INGREDIENTS:

4 roma tomatoes, diced

1/2  yellow pepper, halved and diced

1/2 red pepper, halved and diced

1/2 red onion diced

2 avocados, diced

1 bunch of fresh cilantro, finely chopped

1 15oz. can pinto beans, drained and rinsed

1 15oz. can black beans drained and rinsed

1 can sweet corn drained

You will also make a sweet and savory dressing to immerse the Cowboy Caviar with. When you add this to this mix of veggies and beans, it sets the delicious factor over the top!

DRESSING:

2 Tablespoons red wine vinegar

1 Tablespoon lime juice

1/3 cup olive oil

1/3 cup sugar

1 Teaspoon onion powder

1 Teaspoon oregano

Salt/Pepper for taste

INSTRUCTIONS:

In a large bowl, combine all of the salad ingredients together except for the avocados. (corn, tomatoes, beans, cilantro, bell peppers, and red onion). 

In a smaller bowl, whisk together ingredients for dressing and pour over the salad mixture.

Refrigerate for at least 1 hour before serving so that the flavors can combine together. Just before serving add in the diced avocado.

Serve with your favorite tortilla chips or veggies and enjoy! It is so addicting, you will have a hard time eating just a few bites!